
Updated on 15th of May 2021 for Keycloak 13.0.0 with Postgres 13.2.
6th of June 2021: Follow up: setting up Keycloak with TLS for local development.
Keycloak is an open source Identity and Access Management System developed as a JBoss community project under the stewardship of Red Hat. Keycloak makes it is easy to secure apps and services written in many technologies using a large number client libraries.
Out of the box, we get things like Single Sign-On, Identity Brokering and Social Login, User Federation and Authorization Services.
With little to no code, we can give users of our apps the ability to sign in with Identity Providers like GitHub, Twitter or Google. Well, anything that’s capable of talking OpenID or SAML. On the other hand, we can easily connect to existing LDAP or Active Directory servers to integrate with corporate services of this world.
Here, I’m going to show how can we launch and configure a local Keycloak server to play with. The only dependency is docker with docker-compose.
§Docker Compose
Docker Hub contains prebuilt Keycloak images. The version deployed here is 13.0.0.
Let’s start with the compose.yml file.
|
|
Next to the compose.yml file, we need the .env file.
KEYCLOAK_VERSION=13.0.0
PORT_KEYCLOAK=8080
POSTGRESQL_USER=keycloak
POSTGRESQL_PASS=keycloak
POSTGRESQL_DB=keycloak
That’s it, we can now start our Keycloak:
docker-compose -f compose.yml up
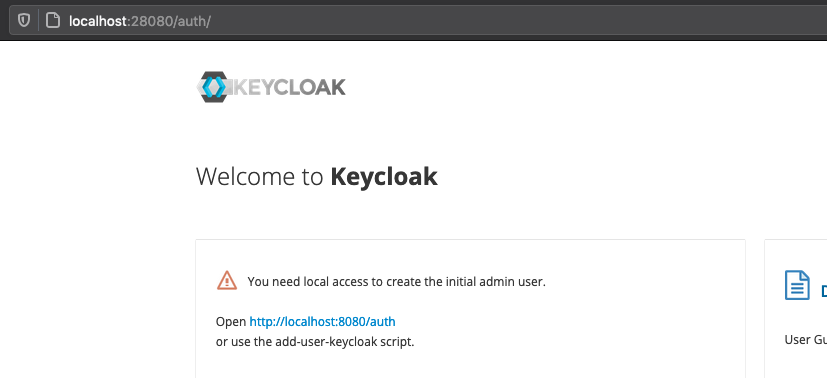
After a short moment, we can go to Keycloak landing page using the local address http://localhost:28080. Keycloak will welcome us with this page:
§Intermission
Before we move on, let’s quickly figure out what has happened so far.
- With Docker Compose, we have started a Keycloak server with PostgreSQL 13.2 as a database. PostgreSQL protocol is at a stable version 3 since PostgeSQL 8 days so it does not really matter which newer version is used.
- Using the
.envfile, we have specified that we want Keycloak13.0.0and our Keycloak shall connect to Postgres usingkeycloakusername andkeycloakpassword as the credential. - The database used by Keycloak is also called
keycloak. - The same variables are used for the
postgresservice. - The Postgres container will automagically create a user identified by
POSTGRES_USERvariable, authenticated by the value ofPOSTGRES_PASSWORD. - We have specified
POSTGRES_DBso the container created the database and configured access for our new user. - Both containers run in the same bridge network called
local-keycloak. Actually, in Docker it’s called something else:
[rad] dev-keycloak $ docker network ls | grep keycloak
920dd184892c        dev-keycloak_local-keycloak              bridge              local
The name of the network is essentially:
basename $(pwd) + <name-from-compose.yml>
- We have exposed the
28080port to the host so we can reach Keycloak from the browser. - Finally, we named the Keycloak container as
local_keycloak. We will use this name shortly.
§Administrator account
Okay, so Keycloak is running but we can’t do anything with it because we need to create an Administrator account. That we can also do with Docker.
While the compose setup is running, run this in your terminal:
docker exec local_keycloak \
    /opt/jboss/keycloak/bin/add-user-keycloak.sh \
    -u admin \
    -p admin \
&& docker restart local_keycloak
Once this command finishes, you will see that the compose local_keycloak is going to restart. Give it a short moment and reload the Keycloak landing page.
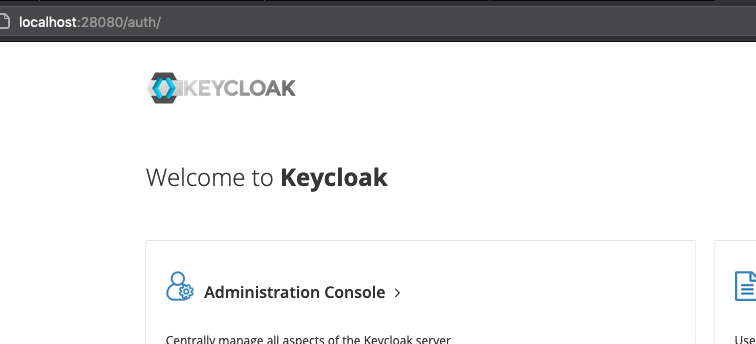
Click Administration Console link and sign in with admin as the username and admin as the password. Welcome to Keycloak.
§Further reading
Keycloak source code can be found on GitHub.